

Claude Code is Anthropic's official CLI that puts a senior AI engineer in your terminal. You run it from the command line, it sees your whole project, and it executes changes across multiple files without losing context.
📥 Want the exact prompts I use every day? Grab the free library of 100+ Claude Code prompts and automate your PRs in minutes.
You know the frustration: you debug for hours something a more experienced dev finds in minutes. Or you have 5 side projects started and none finished because the code slows you down faster than your creativity generates ideas.
This Claude Code tutorial for 2026 condenses everything I learned taking real projects to production from Uruguay to Silicon Valley.
Claude Code changes that:
Before: 1 PR per week. Hours debugging. Unfinished side projects.
Now: 1 PR per day. Features in parallel. Products that actually ship.
Claude Code Mastery
Aprendé a usar Claude Code en contexto real. 5 módulos, 15 lecciones, ejemplos de producción.
This is the complete guide. Step by step, with real production examples.
Who This Guide Is For
- ✅ If you want to build products but code slows you down (you don't need to be a programmer)
- ✅ If you already code and want to multiply your speed significantly
- ✅ If you're tired of agents that "forget" your project halfway through
- ✅ From basic setup to advanced workflows, it's all covered
What You'll Learn
- Strategic setup, install and config that works from day one
- The CLAUDE.md system, persistent memory so Claude never forgets your architecture between sessions
- The 3 working modes, when to use each for max speed without breaking anything
- Advanced Git workflows, branches and worktrees to work on 3 features in parallel without chaos
- Context management, keep Claude focused on big projects without "forgetting" everything
- Specialized sub-agents, testing, reviews, and docs that happen on their own while you keep coding
- Hook automations, commands that run themselves at the right moment
- Bulletproof testing and CI/CD, deploy to production with confidence
🔔 Want advanced tips I don't publish here? Every Tuesday I send workflows, exclusive prompts, and mistakes I made (so you don't).
Get what I don't publish
Every Tuesday: workflows, prompts, and the mistakes I made so you don’t. Free.
💡 Why Claude Code Is Different
I've tried Cursor, Copilot, and v0. Claude Code wins on complex projects:
Context: Cursor handles ~10k tokens and starts to "forget" your architecture. Claude Code handles 200k tokens, it can see your entire project at once without losing the thread.
Tracking: It creates TODOs at the start and keeps them visible through the whole session. It doesn't get lost halfway through a 50-file refactor.
I use it for everything: from 30-second edits to 4-hour features, reviewing Jira tickets, doing team code reviews. For complex projects where context matters, I haven't found anything better.
How Does Claude Code?
When you work on a big feature, it starts with a plan and creates a TODO list. That keeps it aligned and preserves context through the whole session.
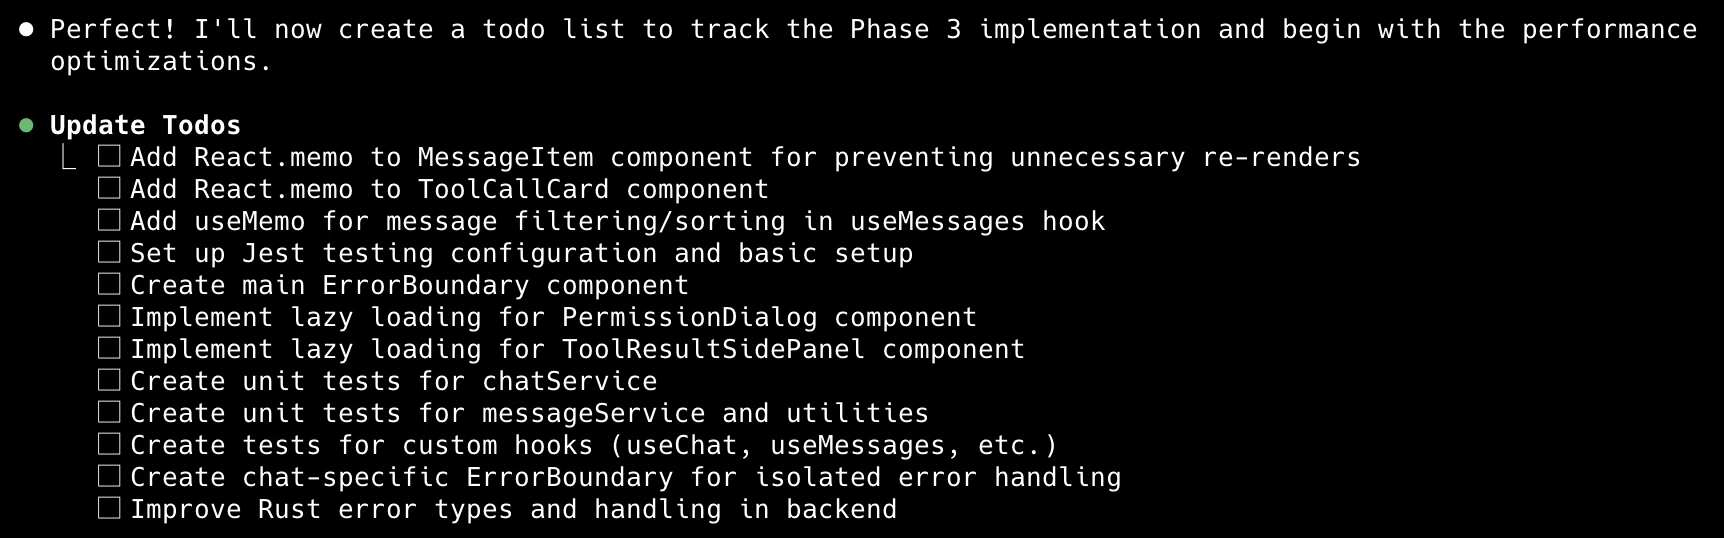
Then it completes those tasks one by one, calling tools to read code, update it, and even create files from scratch.
The best part is it does this recursively: it writes a file, remembers it needs to update an import, and keeps going.
When it finishes a task, it marks it complete and moves to the next.
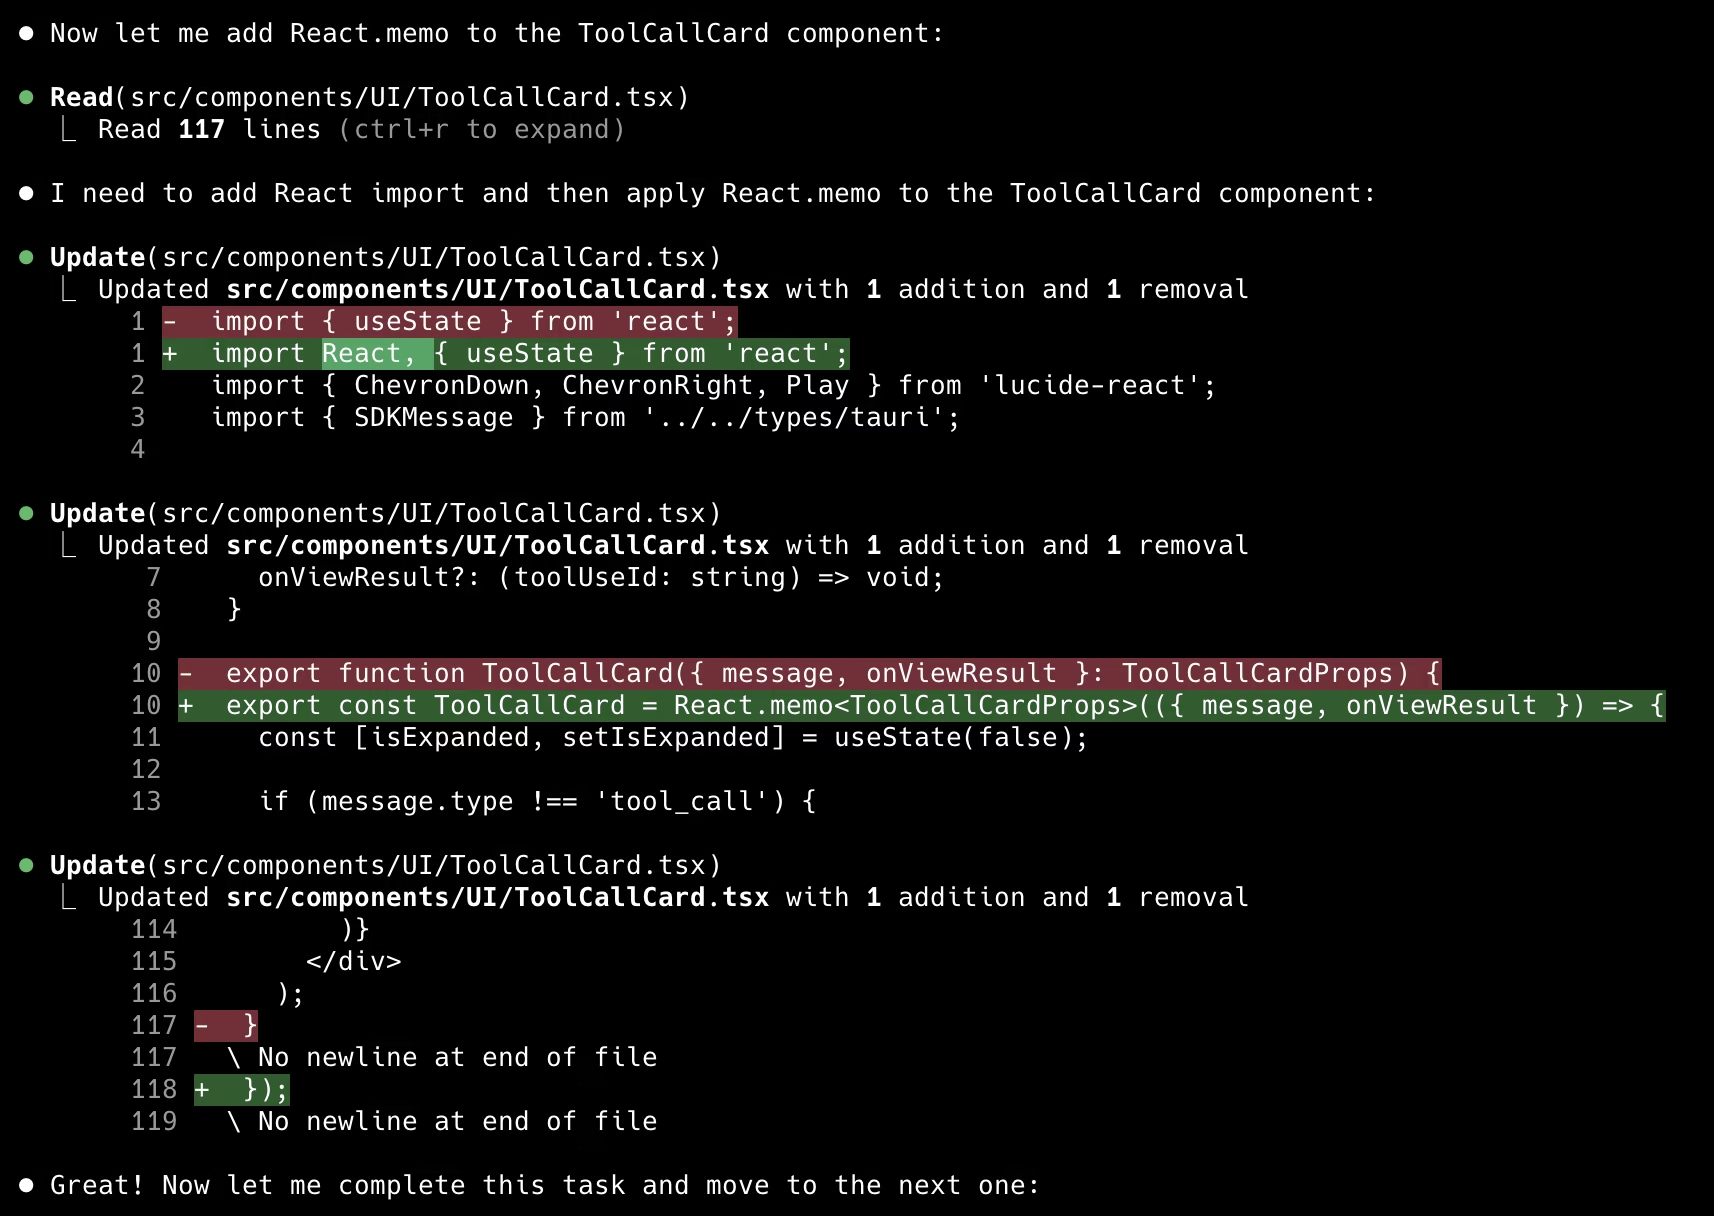
It's also proactive: if you ask it to remove a hard-coded value, it automatically searches for that value across other files and removes it everywhere.
Now let's set it up.
Initial Setup
First we install Claude Code. We'll install it globally but call it locally. Open your terminal and run this anywhere (it's global, so location doesn't matter). For more detail, see the official Claude Code quickstart. (Want the step-by-step on video? See the Installation and Configuration lesson.)
npm install -g @anthropic-ai/claude-codeCreate a folder for your project and initialize Claude Code. I keep a ~/dev folder with all my apps and projects. Let's create a finance-tracker folder for our app.
mkdir finance-tracker
cd finance-tracker
claude
That last command starts a REPL, a local instance of Claude scoped to that folder, which means Claude can only see and interact with what's inside that folder and its subfolders.
The first time, it walks you through setup. Pretty simple, just follow the instructions. Pay attention to the authentication step.
You can pay for Claude Code via the API (usage-based) or by connecting an existing Claude account (which you already have if you use the web app).
My recommendation is to connect with an account, since API costs can get out of hand. Start with the $20/month plan and move up a tier if you keep hitting limits.
Ver curso gratuito: Claude Code Mastery🎓 Prefer learning by video? The free Claude Code Mastery course includes live demos of this entire setup.
The 3 Modes of Claude (When to Use Each)
Now that it's set up, remember you're in an empty folder. Let's ask Claude to create our project from scratch.
Pro tip: For VERY large projects (50+ features, multiple services), I sometimes plan first in ChatGPT and generate a full PRD, then hand it to Claude Code to execute. But for 90% of features and projects, Plan Mode directly in Claude is more than enough and much faster.
There are 3 ways to work with Claude. You switch between modes with Shift + Tab. (Want to know when to use each mode? See the Mode Decision Guide lesson.)
Default Mode
By default you're in "Default Mode". You tell Claude to do something, it suggests changes, waits for your permission, and then executes.
With the "Output Styles" feature, you can even ask Claude to explain why it's doing what it's doing. Type /output-style to see how it works.
Auto Mode
This is the real Vibe Coder mode. Claude works on your code and edits files without waiting for permission. You can tell it to work on a feature and go grab a coffee while it does.
It'll still ask permission to run certain bash commands (like installing a package). That's for safety, but there's a way to skip it if you really want to #YOLO:
- Type
/permissionsto add which commands it can run without asking - Start Claude with the
--dangerously-skip-permissionsflag to skip all permissions. I don't recommend this unless you already have the advanced documentation and git flow I describe later.
Even in auto mode you can stop the process by pressing Esc if it's heading the wrong way.
Plan Mode: Think Strategically First
The third and final mode is Plan Mode. Instead of jumping straight into writing code, Claude uses its reasoning to build a comprehensive strategy. (For the full deep dive, read the dedicated Plan Mode guide, or see the Plan Mode lesson.)
Use Plan Mode when you're about to start a new feature, work on a complex challenge, refactor code, or basically any new project. You control the depth with phrases like "think", "think hard", and "ultrathink".
Switch to Plan Mode and paste this:
Hey Claude! I want to build a personal finance tracker web app. Here's the vibe:

- Clean, modern interface (think Notion meets Mint)
- Track income, expenses, and savings goals
- Beautiful charts and insights
- Built with React and a simple backend
- Should feel fast and delightful to use
This is where the magic starts.
Claude creates a complete action plan with architecture, design, pages, routes, everything you need. IT'S INCREDIBLE.
Since we're still in Plan Mode, it presents the plan first. You can accept it right away, but I suggest giving feedback for more control over what it builds.
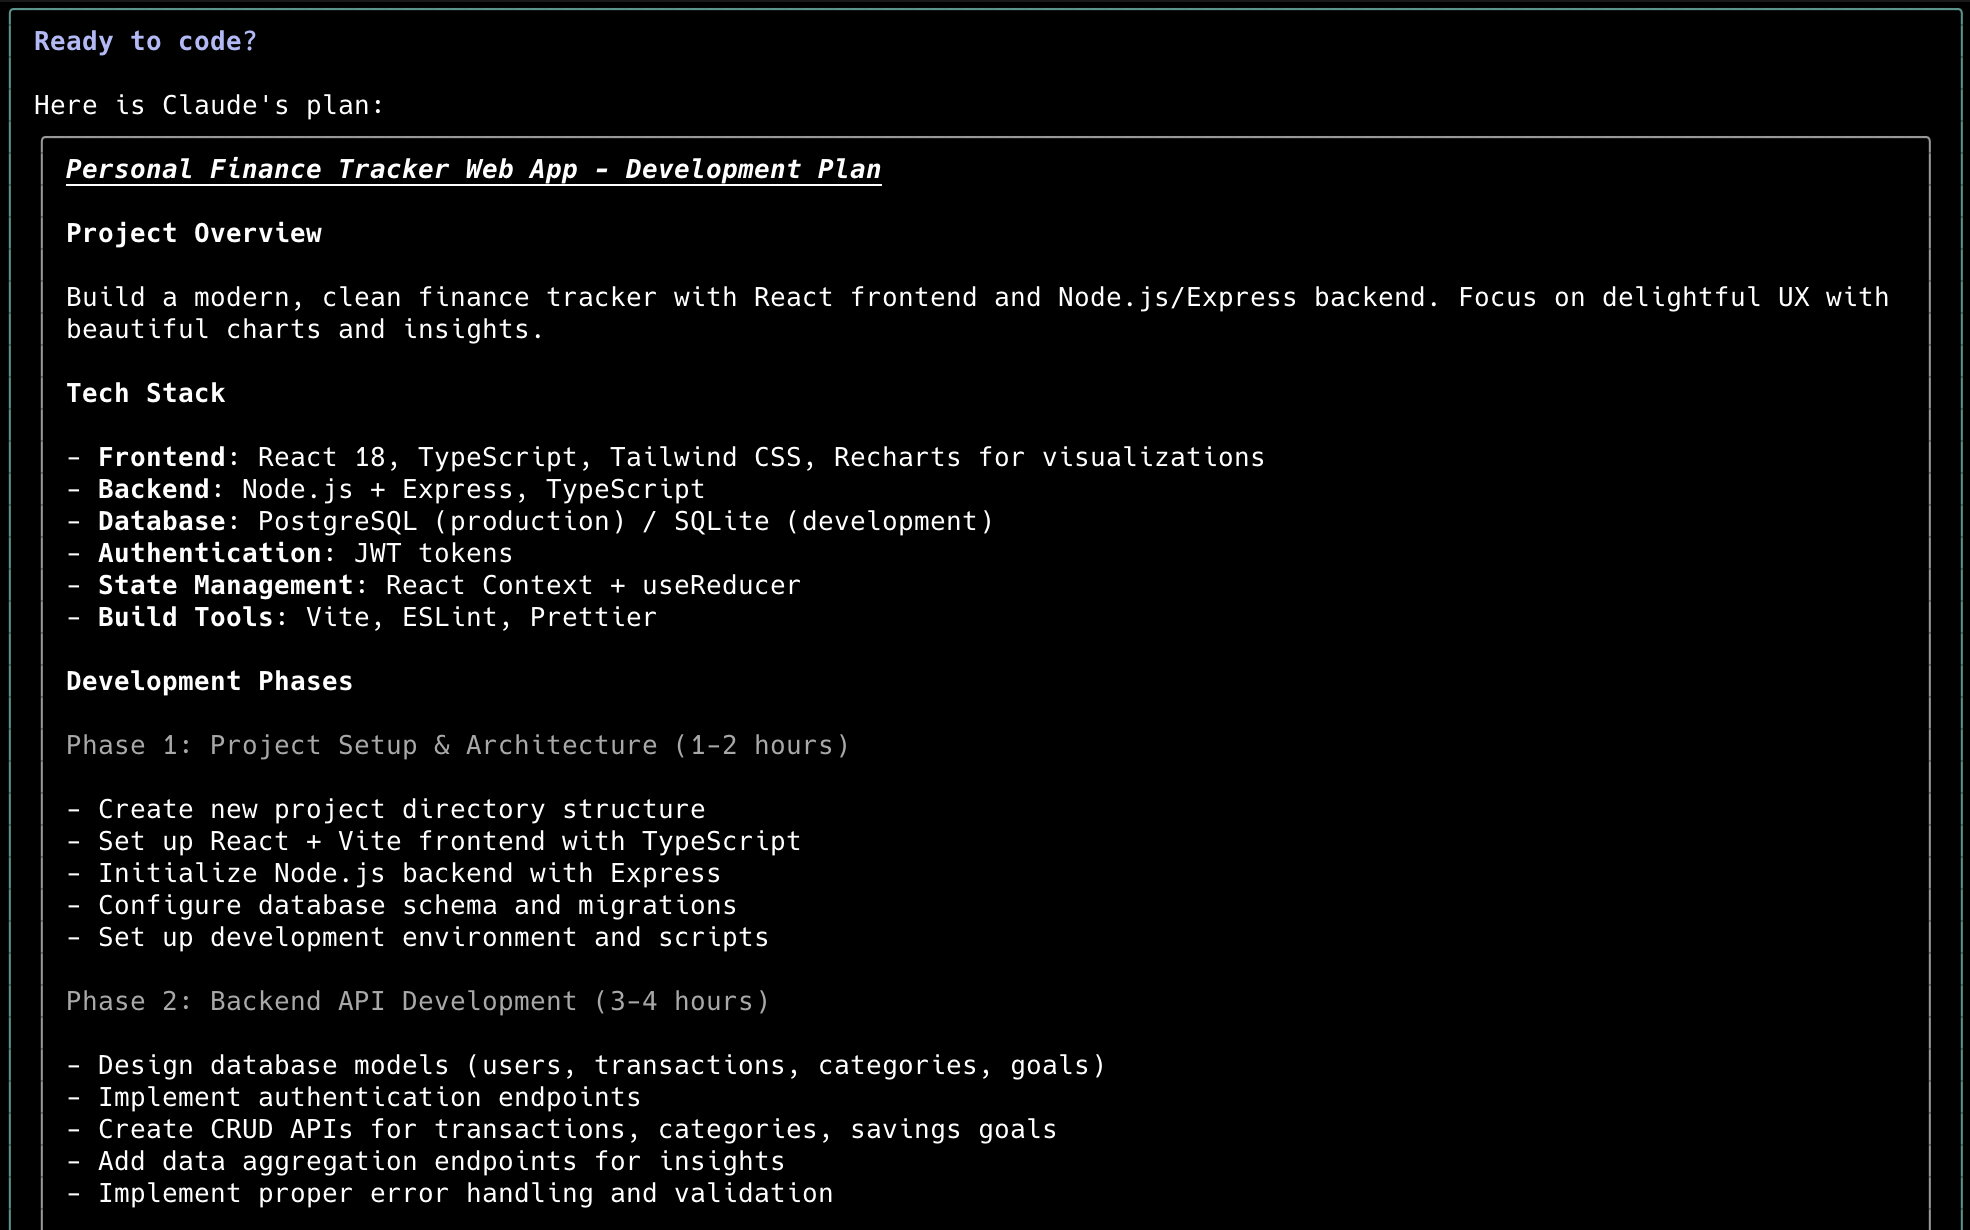
Press Esc, type your feedback, and Claude reworks the plan. When you're happy, tell it to execute.
💡 Pro tip: The prompts I use for Plan Mode are in my free library. Workflows tested in real production.
Get what I don't publish
Every Tuesday: workflows, prompts, and the mistakes I made so you don’t. Free.
Memory & Documentation: The System That Makes Claude "Remember"
Now you have your app built. Perfect, right? NO.
Here's the problem nobody tells you: the next time you start Claude, it forgets everything. Your architecture, your decisions, your conventions. You start from scratch.
That's why this next part is the difference between actually shipping vs. getting frustrated and quitting.
The CLAUDE.md system lets Claude keep memory between sessions, architectural decisions, code conventions, and patterns it should follow. Without it, Claude "forgets" everything each time you start a new chat. (For the full detail, read What is the CLAUDE.md file?, or see the The CLAUDE.md File lesson.)
When Claude finishes the first version of your app, type /init. This command initializes Claude the first time you run it in your project. If you already have an existing project, run this first.
When it runs, Claude reviews the whole project and creates a CLAUDE.md markdown file. This is your project's memory. It stores all the conventions, decisions, patterns, and context that persist from one session to the next.
It should look something like this:
# CLAUDE.md

This file provides guidance to Claude Code when working with code in this repository.

## Architecture

This is a full-stack personal finance tracker with a React frontend and Node.js/Express backend:

- **Frontend**: React 18 with Vite, single-page application
- **Backend**: Express.js REST API with SQLite database
- **Database**: SQLite3 with three main tables: transactions, categories, savings_goals
- **Communication**: Frontend calls backend API at `http://localhost:3001/api/`

## Database Schema

- `categories`: id, name, color, icon
- `transactions`: id, type (income/expense), amount, description, category_id, date
- `savings_goals`: id, title, target_amount, current_amount, target_date
Every time you start a chat with Claude Code, this document is added as part of the prompt. That's why it helps to keep it updated as your project evolves. You can edit it directly or use the # command while you chat:
# Always use error boundaries around components that make API callsGet in the habit of doing this while you work and notice patterns you want Claude to follow or avoid.
The CLAUDE.md File Hierarchy
Claude Code supports multiple CLAUDE.md files across your folder hierarchy, letting you organize knowledge at different levels of specificity. Very useful for managing context when your codebase gets big.
A pattern I use is a main CLAUDE.md for the project, plus a specific file for the frontend and the backend:
~/.claude/CLAUDE.md                    # Global user preferences
~/dev/                                 # Parent directory
├── CLAUDE.md                          # Organization/team standards
└── finance-tracker-pro/
    ├── CLAUDE.md                      # Project-specific knowledge
    ├── backend/
    │   └── CLAUDE.md                  # Backend-specific patterns
    ├── frontend/
    │   └── CLAUDE.md                  # Frontend-specific patterns
    └── docs/
        └── CLAUDE.md                  # Documentation guidelines
You can also set a global CLAUDE.md that applies to all projects on your machine. That's where personal preferences about how you code live.
How Claude processes the hierarchy:
- Claude reads all applicable CLAUDE.md files
- More specific files override general ones
- All relevant context is combined automatically
- Claude prioritizes the most specific guidance for each situation
Additional Documentation
Beyond the CLAUDE.md files, I also add project docs inside a docs folder, the initial PRD, plus files for architecture, design principles, database schemas, and more. Then in my CLAUDE.md, I point to where the docs live:
# Finance Tracker Pro - Main Documentation

@docs/architecture.md
@docs/design-standards.md
@docs/database-schema.md
@docs/testing-strategy.md

## Project Overview

[Your main project description]
This separates what goes into the prompt and fills the context window (the CLAUDE.md files) from what stays outside until it's referenced.
Collaboration & Version Control
CLAUDE.md files should be treated as critical infrastructure:
- Add the CLAUDE.md files to your repository
- Include them in your code review process
- Use conventional commit messages for documentation changes
- Tag them as major changes
Extended Thinking: Claude's Secret Superpower
Here's something almost nobody uses but is BRUTAL for complex problems: Extended Thinking Mode.
Claude 3.7 and Claude 4 can "think before acting", they literally generate internal reasoning steps before giving you the answer. It's like having a senior developer take 5 minutes to think through the right approach before writing code.
The 4 Levels of Thinking
Claude Code has progressive depth levels you trigger with keywords:
1. Normal (default), no thinking mode
- Fast responses, direct knowledge
- Perfect for: simple edits, minor refactors, direct questions
2. "think", basic thinking (~2-5k reasoning tokens)
think about the best architecture for this feature- Claude explores 2-3 approaches before deciding
- Perfect for: new features, architectural decisions
3. "think hard", intermediate thinking (~5-10k tokens)
think hard about potential edge cases in this authentication flow- Claude evaluates multiple strategies, considers trade-offs
- Perfect for: complex debugging, optimizations, security reviews
4. "ultrathink", deep thinking (~10-16k+ tokens)
ultrathink this database migration strategy and all potential failure modes- Claude does exhaustive reasoning, explores alternative paths
- Perfect for: critical architecture, problems that have you stuck for hours
When to Use Extended Thinking
❌ DON'T use thinking for:
- "Add a red button here"
- "Change the text of this heading"
- "Install this package"
- Any mechanical, direct task
✅ DO use thinking for:
Case 1: Claude is stuck in an error loop. It tried to fix an auth bug 3 times and each fix created a new error.
ultrathink why this auth bug keeps reappearing after each fix. Analyze the root cause, not just symptoms.It found the problem was a race condition in token initialization, not the auth code.
Case 2: Big architectural decisions. When migrating from REST to tRPC:
think hard about the migration strategy from REST to tRPC. Consider backwards compatibility, migration path, performance, and development velocity.Claude evaluated 4 approaches and chose gradual migration with adapters, saving weeks of refactoring.
Case 3: Performance debugging. An endpoint took 2 seconds. I tried 5 obvious fixes, nothing worked.
ultrathink the performance bottleneck in this API endpoint. The obvious culprits (N+1 queries, missing indexes) aren't it.Claude identified the problem was in-memory JSON serialization of large objects, a non-obvious fix only deep thinking found.
Trade-offs of Extended Thinking
Pros: more robust solutions, fewer fix-break-fix iterations, finds edge cases you missed, better for complex problems.
Cons: slower responses (10-30 seconds extra), uses more tokens, overkill for simple tasks.
My Personal Strategy
- 80% of the time: no thinking (normal edits, straightforward features)
- 15% of the time: "think" or "think hard" (new features, reviews)
- 5% of the time: "ultrathink" (when I'm stuck for >1 hour or it's critical architecture)
Ultrathink is my "call a friend" when something is genuinely hard. I use it 2-3 times a week max.
Pro Tip: Combine Thinking with Plan Mode
The most powerful combo:
[Switch to Plan Mode + Extended Thinking]

ultrathink the complete refactor strategy for migrating our authentication system from JWT to session-based auth. Create a comprehensive plan considering backwards compatibility, zero-downtime deployment, and data migration.
Claude builds an exhaustive plan considering every edge case. It's like having a staff engineer think through your architecture for 20 minutes.
🎁 Want more strategies like these? Get workflows, exclusive prompts, and advanced tips I don't publish on the blog.
Get what I don't publish
Every Tuesday: workflows, prompts, and the mistakes I made so you don’t. Free.
❌ 5 Mistakes That Cost Me Hours (And How to Avoid Them)
I made all of these on real projects. Learn from my suffering.
1. Auto Mode Without Git Branches = Guaranteed Disaster
The mistake: I left Claude in auto mode on my main branch. It broke 3 core backend files. The cost: 2 hours of rollback + debugging + fixing. The lesson: NEVER auto mode on main. ALWAYS on a feature branch. Git branches aren't optional, they're your safety net.
2. Not Clearing Context = Confused Claude and Mixed Code
The mistake: I worked on 3 features in the same chat without running /clear between them.
The cost: Claude started mixing patterns across features. Subtle bugs that took hours to find.
The lesson: One chat = one feature. /clear religiously when you finish. Clean context is clean code.
3. Outdated CLAUDE.md = Constant Regression
The mistake: I added features but didn't update CLAUDE.md with the new decisions. The cost: Claude "forgot" architectural decisions and recreated old code. I had to refactor twice. The lesson: Updating CLAUDE.md is part of the dev workflow, not optional. I do it after every big feature.
4. Not Reviewing Before Commit = Weird Code in Production
The mistake: I blindly trusted Claude and committed directly without reviewing the changes. The cost: Claude added unnecessary comments and code that "worked" but wasn't idiomatic. The lesson: ALWAYS review before commit. Claude is great, not perfect. Your brain is still required.
5. --dangerously-skip-permissions Without Backup = Total Panic
The mistake: I used the YOLO flag without git branches configured. Claude installed packages that broke dependencies. The cost: 1 hour fixing package.json and reinstalling everything. The lesson: Skip permissions ONLY when you have git + branches set up. Speed without safety is recklessness.
Context Management: Stop Claude from "Forgetting"
When you start a new chat, Claude brings all CLAUDE.md files into the context window. A context window is the maximum amount of text (measured in tokens) a model can consume at once to generate a response. (Want to go deeper? See the Context Management lesson.)
As you chat, the message history is stored in the context window, plus all the files it reads, code it generates, and tool results.
This fills up fast, and at some point you'll see a small notification telling you the context window is filling. Once it runs out, Claude automatically compacts (summarizes) the conversation and continues from there.
We want to avoid that because we can lose important context. Here are my best practices:
- Keep one chat per project or feature so all context stays relevant.
- As soon as you finish that feature, use
/clearto reset and start fresh. - If you need to go back, use
/resume. - If a project or feature is too big for one context window, ask Claude to split the project plan into a markdown file. Then have Claude do the first part in one chat. When it finishes, ask Claude to update the plan,
/clear, then reference the plan and continue.
If you're running low on context but can't fully clear it yet, use /compact with instructions on what to keep:
/compact Focus on preserving our current authentication implementation and the database schema decisions we've made.Using Sub-Agents
The problem: One Claude handling everything = saturated context + no specialization The solution: Specialized sub-agents (reviewer, tester, docs writer) with isolated contexts The result: Complex workflows without polluting context, each agent an expert in its area
Sub-agents are an advanced way to manage context. They're specialized AI assistants with their own instructions, context windows, and tool permissions. (For the deep dive, see the Sub-Agents lesson.)
For example, you can set up different sub-agents to review code, test code, and update documentation.
You ↔ Main Claude (coordinator)
    ├── Code Reviewer (quality specialist)
    ├── Test Engineer (testing specialist)
    └── Documentation Writer (technical writing specialist)
While your main Claude builds the feature, it delegates to sub-agents based on context analysis, but you can also invoke agents explicitly.
Each sub-agent keeps its own conversation history and context, so the main chat doesn't fill up with the sub-agent's context. You can also limit access to certain tools.
Setting up a sub-agent is easy, Claude does it for you. Use the /agents command, follow the instructions, and tell Claude what kind of sub-agent you want. They appear as markdown files you can edit:
---
name: code-reviewer
description: Comprehensive code quality and maintainability analysis
tools: read, grep, diff, lint_runner
---

You are an expert code reviewer:

## Review Priorities (in order):

1. **Logic errors and bugs** that could cause system failures
2. **Security vulnerabilities** and data protection issues
3. **Performance problems** that impact user experience
4. **Maintainability issues** that increase technical debt
5. **Code style and consistency** with project standards

IMPORTANT: Only report significant issues that require action.
Provide specific, actionable improvement suggestions.
Usage pattern: When you finish a feature, instead of running tests and reviewing in the same chat, delegate it to a sub-agent. It does the work and sends results back to the main chat without filling the context window.
🚀 Is this guide helping? Get content like this every week + exclusive prompts I don't publish on the blog.
Get what I don't publish
Every Tuesday: workflows, prompts, and the mistakes I made so you don’t. Free.
Saving Your Work: Git Branches
At this point you should have the core of your project built with proper documentation and context-management strategies. That keeps Claude on track but doesn't stop it from making mistakes.
If you're new to AI coding, you've experienced the equivalent of a blue screen where something goes wrong, the agent can't fix it, and you have to start over. We use Git to make sure Claude doesn't touch our core code:
- Every time you start a new project or feature, first ask Claude to create a new branch. Any change you make is isolated to that branch and doesn't impact main. If you break everything, just go back to main and delete the branch.
- When Claude finishes, ask it to test the app. Let Claude do its default testing, and run the app yourself to check for errors.
- If everything looks good, ask Claude to update the docs if needed, then commit the changes.
- For a multi-part feature, repeat. When you're satisfied with everything, ask Claude to merge back into main.
Git Worktrees: 3 Projects in Parallel Without Chaos
⚠️ ADVANCED SECTION, if you're new to Git, skip this and come back later.
The problem: One branch = one Claude = total bottleneck The solution: Git worktrees + multiple Claude instances working in parallel The result: 3x more velocity without code conflicts or lost context
Git worktrees let you have several branches locally at once, each in its own folder. Combined with Claude Code, that means multiple Claude instances can work on different features in parallel, each keeping its own conversation and context.
# From your main project directory
cd finance-tracker

# Create a worktree for budget features
git worktree add ../finance-tracker-budgets -b feature/budget-system

# Create a worktree for reporting
git worktree add ../finance-tracker-reports -b feature/reporting-dashboard

# List all worktrees
git worktree list
Then start Claude in each one:
# Terminal 1: Budget features
cd ../finance-tracker-budgets
claude --dangerously-skip-permissions

# Terminal 2: Reporting features
cd ../finance-tracker-reports
claude --dangerously-skip-permissions

# Terminal 3: Main development
cd finance-tracker
claude
We use --dangerously-skip-permissions so Claude works without waiting on us. That's fine because any mistake is isolated to that worktree.
📊 My experience: This setup let me work on multiple projects in parallel without losing context. Three terminals, three Claudes, zero conflicts. It's the workflow I use every day.
Custom Slash Commands
Throughout this guide I introduced several slash (/) commands, which you see when you type / while talking to Claude. Those are the defaults, but you can create your own!
Custom commands let you program repeatable processes and workflows specific to your team or project. (Want to build them step by step? See the Custom Slash Commands lesson.)
First, set up a folder to store commands as markdown files:
mkdir -p .claude/commandsThen create a markdown file for each custom command. For example, a /review command (.claude/commands/review.md):
Perform a comprehensive code review of recent changes:

1. Check code follows our TypeScript and React conventions
2. Verify proper error handling and loading states
3. Ensure accessibility standards are met
4. Review test coverage for new functionality
5. Check for security vulnerabilities
6. Validate performance implications
7. Confirm documentation is updated

Use our code quality checklist and update CLAUDE.md with any new patterns discovered.
Custom commands saved in .claude/commands/ are automatically shared with your team when they clone the repo, creating consistent workflows across the whole team.
Model Context Protocol (MCP): Connecting Claude to Your Whole Stack
MCP (Model Context Protocol) is Anthropic's open standard that lets Claude Code connect to any external tool. It's like giving Claude specific superpowers. (Want to see real integrations? See the MCP Integrations lesson.) The 5 that changed my workflow most:
1. MailerLite, Newsletter automation
claude mcp add mailerlite -s project"Claude, add these 50 emails to the community list" or "create a campaign with this content to send tomorrow." All from the terminal.
2. Playwright, Automated browser testing
claude mcp add playwright -s project -- npx @modelcontextprotocol/server-playwrightClaude navigates the app, runs full E2E tests, takes screenshots when something fails. Essential for UI debugging.
3. Linear/Jira, Project management
"Claude, create a ticket for this bug with these details" and it's created automatically. Zero context switching.
4. Notion, Documentation sync
Claude reads Notion docs and updates databases, keeping your single source of truth in sync.
5. Brave Search, Real-time info
claude mcp add brave-search -s project -- npx @modelcontextprotocol/server-brave-search"Claude, look up the latest best practices for [technology X] 2026 and implement them in this code."
To add an MCP:
claude mcp add [name] -s projectThen just ask Claude to use that integration. There are dozens available, check the official list on Anthropic's site or build your own.
Hooks: Automations That Save Hours Every Week
Hooks are user-defined commands that run automatically at specific moments in Claude Code's lifecycle. They don't depend on Claude "remembering" to do something, they fire automatically when specific events occur. (Want to set them up right? See the Hooks lesson.)
Available Hook Types
- PreToolUse, before Claude runs a tool (can block execution)
- PostToolUse, after a tool runs successfully
- UserPromptSubmit, when the user submits a prompt
- Notification, when Claude sends notifications
- Stop, when Claude finishes responding
How to Configure Hooks
Type /hooks in your chat. Claude guides you through it. Hooks are saved in three possible places:
~/.claude/settings.json, global config (all projects).claude/settings.json, project config (commit it to share with the team).claude/settings.local.json, local project config (don't commit)
Real Examples I Use Every Day
Hook 1: Auto-format code after each edit
# PostToolUse hook for Edit tool
prettier --write {file_path}
Consistent code, zero manual effort.
Hook 2: Block edits on production files
# PreToolUse hook for Edit tool
if [[ "{file_path}" == *"production/"* ]]; then
  echo "ERROR: Cannot edit production files directly"
  exit 1
fi
Claude physically cannot touch production files. Safety first.
Hook 3: Validate tests pass before commit
# PreToolUse hook for Bash(git commit*)
npm test || exit 1
If tests fail, the commit is blocked. No more "fix tests later".
⚠️ Hook Security
IMPORTANT: Hooks run with your current environment's credentials. A malicious hook could exfiltrate data. Always review hooks before adding them, especially from public repos.
⚡ Advanced hooks + copy-paste configs, all this and more in my weekly newsletter. No spam, just value.
Get what I don't publish
Every Tuesday: workflows, prompts, and the mistakes I made so you don’t. Free.
Bulletproof Testing: Never Break Production Again
Instead of manually configuring testing frameworks and writing boilerplate, describe your testing philosophy and let Claude Code build the infrastructure. (Want the full flow? See the Testing lesson.)
I want bulletproof testing for our finance tracker:

- Unit tests for all utility functions (currency formatting, date calculations, validation)
- Component tests using React Testing Library for every UI component
- Integration tests for our API endpoints with proper database setup/teardown
- End-to-end tests for critical user flows like adding transactions and viewing reports
- Performance tests to ensure the app stays fast as data grows

Set up the testing infrastructure with proper configuration, then write comprehensive tests for our existing features.
Claude analyzes the code, installs the needed packages, and creates testing utilities specific to your app.
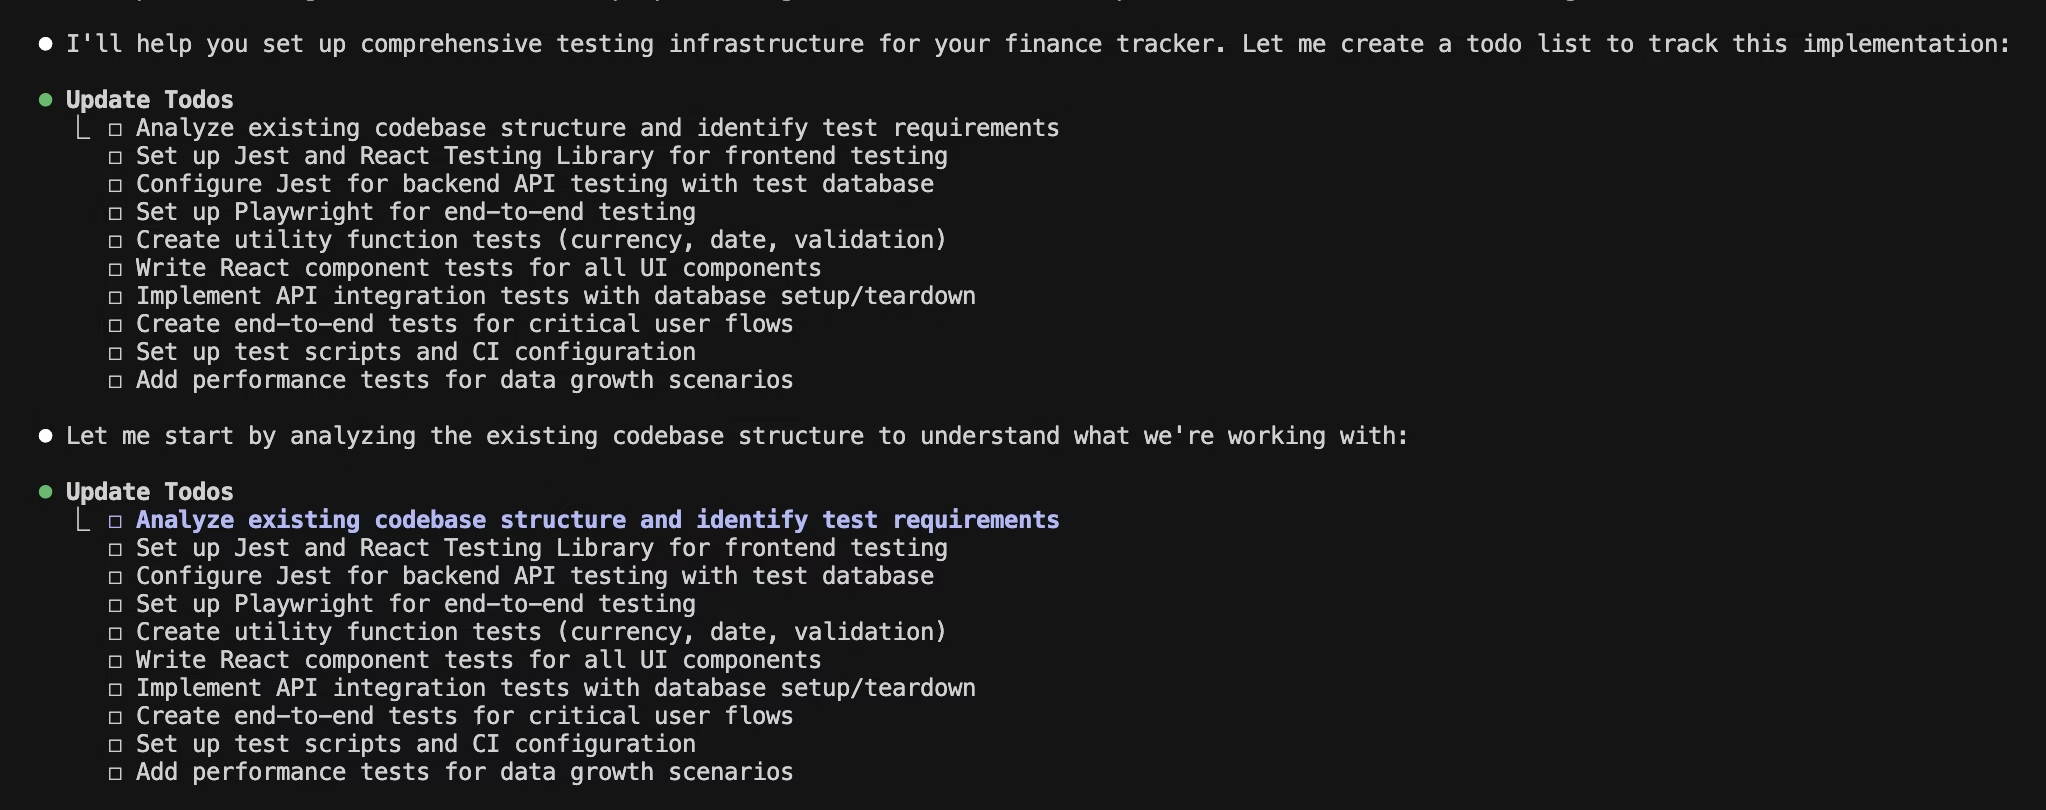
The impressive part: Claude creates tests that reflect your business logic. It identified authentication edge cases I hadn't considered.
Bulletproof CI/CD: Fast Push to Deploy
Now let's automate deployment to production:
I need a rock-solid CI/CD pipeline for our finance tracker.

For every pull request:
- Run the full test suite (unit, integration, E2E)
- Check TypeScript compilation
- Verify code formatting with Prettier
- Run ESLint for code quality
- Build the production bundle successfully
- Run security audits on dependencies

For main branch merges:
- Everything from PR checks
- Deploy to staging automatically
- Run smoke tests against staging
- Send a Slack notification about deployment status

For tagged releases:
- Deploy to production with zero downtime
- Run post-deployment health checks

Make this bulletproof, I never want broken code to reach production.
Claude builds the full flow with GitHub Actions, npm scripts, environment config, and deployment for your host. I use Vercel; Claude knows all the popular services (Vercel, Railway, Fly.io, AWS). Just tell it which you use and it adapts.
Performance Optimization: Without Being an Expert
Claude optimizes based on data, not generic "best practices." You give it real metrics and it attacks the specific bottlenecks. (Want to cut costs and time? See the Cost Optimization lesson.)
Claude Code Mastery
Aprendé a usar Claude Code en contexto real. 5 módulos, 15 lecciones, ejemplos de producción.
- 2+ horas de contenido
- Ejemplos reales
- Acceso inmediato
Our finance tracker is getting slower as users add more transactions:

- Dashboard takes 3+ seconds to load with 1000+ transactions
- The transaction list scrolling feels janky
- Our bundle size has grown to over 1MB
- API responses for transaction queries take 400ms+

Start with a performance audit, analyze the bundle, identify database query bottlenecks, and find frontend performance issues. Then implement the highest-impact optimizations first. I want before/after metrics for everything we change.
Claude makes a plan, optimizes step by step, and shows before/after metrics. I reduced one bundle from 1.2MB to 380KB following its recommendations.
Conclusion: Your Next 7 Days
If you followed this guide, you have all the tools to become a 10x developer. The CLAUDE.md patterns, context management, git workflows, sub-agents, hooks, this is the system real developers use to go from 1 PR/week to 1 PR/day.
But reading isn't enough. You have to execute.
Don't close this guide and come back tomorrow "when you have time." That moment never comes. Do this now. (Want the guided plan? See the 7-Day Plan lesson.)
Today (30 minutes)
- Install Claude Code following the setup in this guide
- Create a new project or open an existing one
- Run
/initto create your first CLAUDE.md - Try the 3 modes (Default → Auto → Plan)
Goal: Get Claude to write even 10 lines of code on your machine. That's it.
Day 2-3 (2-3 hours)
- Pick a side project you've had pending for months
- Use Plan Mode to generate the full plan
- Build the first feature using Auto Mode
- Create your first branch with Claude
- Make your first Claude-generated commit
Goal: 1 working feature in production.
Day 4-7 (1 hour per day)
- Ship 1 new feature per day
- Experiment with Extended Thinking on a hard problem
- Configure at least 1 hook that saves you manual work
- Document your mistakes (you'll make some, that's fine)
Goal: By the end of the week, have a working project that didn't exist 7 days ago.
Keep learning about Claude Code:
- Plan Mode in Claude Code, plan before executing
- What is the CLAUDE.md file?, your project's memory
- Claude Pro vs Max 2026, which plan to choose
- Claude Code rate limits, what happens when you hit the limit
- Agent Loops & Loop Engineering, the harness that separates shippers
- Free course: Claude Code Mastery, 4+ hours, step by step
Claude Code Mastery
Aprendé a usar Claude Code en contexto real. 5 módulos, 15 lecciones, ejemplos de producción.
- 2+ horas de contenido
- Ejemplos reales
- Acceso inmediato